The diagrams in this article were contributed by the generous Clare.
Introduction
In this article we’ll be looking at the science behind making udon noodles, covering every minute aspect to as fine a detail as the information available in Japan. This makes for a very long winded article, but I’m hoping it’ll be as comprehensive as possible. However, if there are any additional questions, feel free to email me or leave a comment below. We’ll be focusing on Sanuki udon from Kagawa prefecture in Japan which has come to be known simply as the standard udon in the western world. We’re not going to cover any of the history behind udon as such information is much better found from more knowledgeable sources. What’s going to be covered here is not all based on scientifically proven information, but mixed in with certain beliefs currently held within the udon making community. I’ll try to point them out when possible.
What does the ‘perfect’ udon noodle look like?
Well made udon noodles are characterised by thick noodles with a firm yet supple elasticity with a chewy yet soft bite, which is called a mochi-mochi (もちもち) texture in Japanese. This is very much different than the more famous ramen as the noodles do not have the same characteristic snappy bite to them but should instead be bouncy. They should also have a smooth surface, rather than the sometimes slightly rougher surface that ramen noodles have.
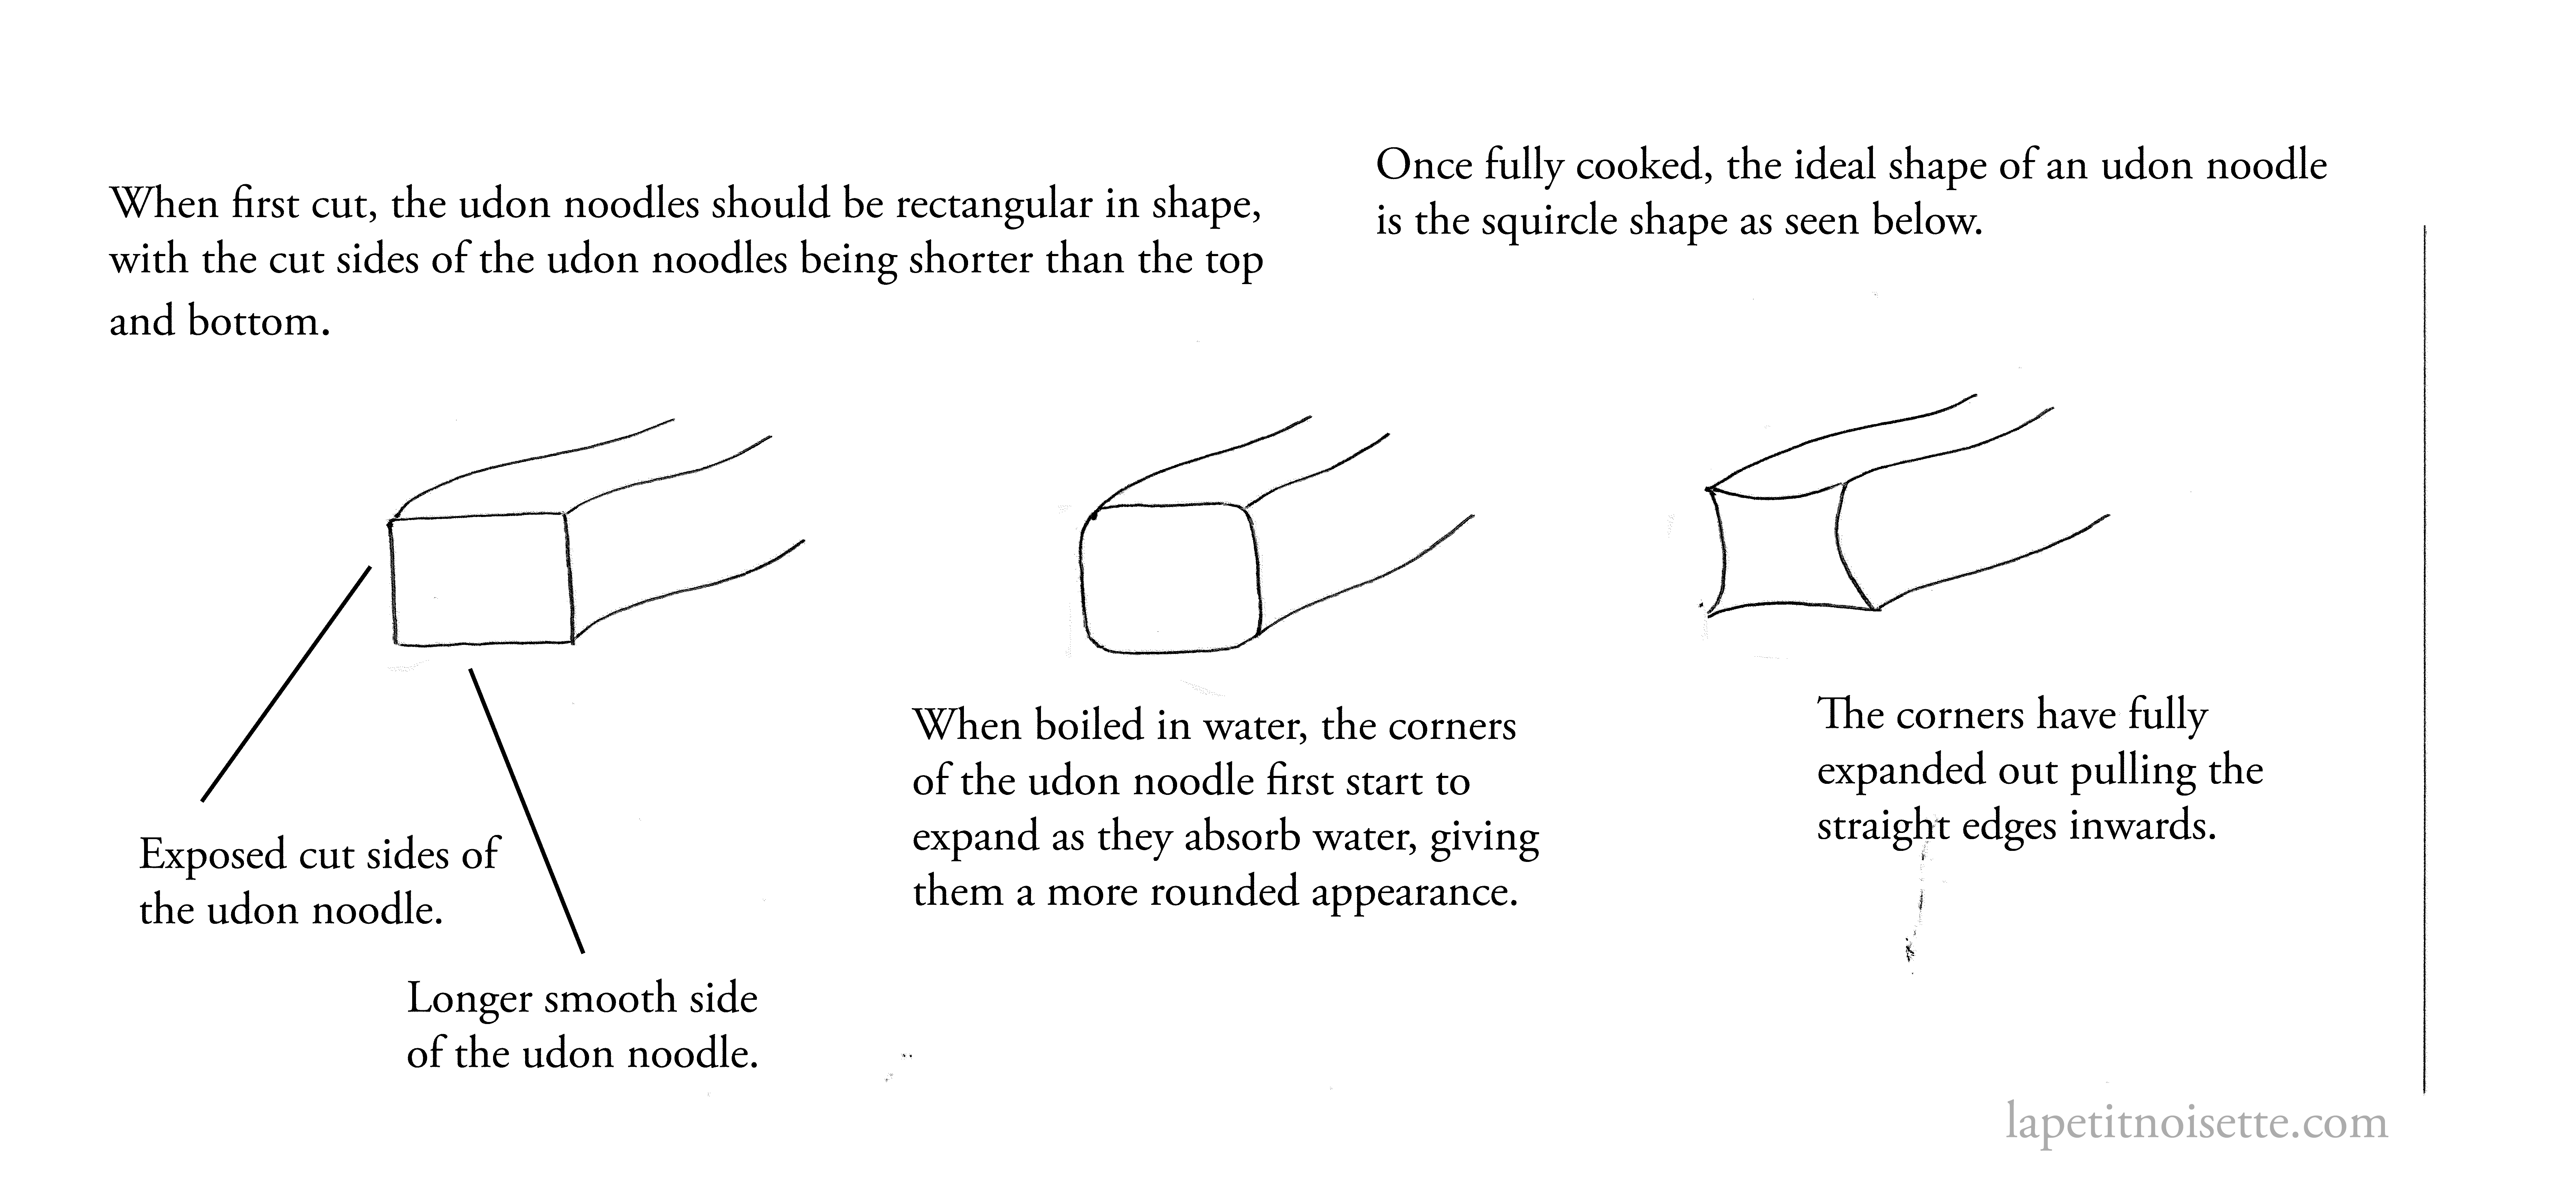
Most importantly though, what we’ll be striving towards to is the final cooking cross-sectional shape of the noodles which should not be a square, but a squircle (I didn’t know what this was called until I googled it), which is formed as the gluten in the noodles absorb the water. If not made properly, the noodles will be of the different shapes seen above. (More information on this can be found in the noodle cutting section).
First a primer on gluten
Flour contains gluten and the two main proteins that make up gluten are gliadin and glutenin, both which are insoluble in water. Gliadin increases the noodle’s stretching and extending abilities, whilst glutenin provides elasticity and resistance to the stretching.
When water is added to flour, the gluten proteins start to connect to each other through cross-links. Kneading dough increases the number of cross-links formed in the dough which eventually forms a gluten matrix or structure that gives noodles its elastic strength or bread its structure. Whilst kneading helps develop the gluten structure, gluten formation starts from the moment water is added to the flour and does not stop even when kneading stops.
Gluten is insoluble in water and hydrophobic, but is able to absorb around twice its weight in water. The higher the protein content of flour the more gluten, which means more cross-links occur when mixed with water and the stronger the gluten structure. This is why cakes use flour with low protein, as you want a cake with a soft texture, not a chewy one, and is why bread uses high protein flour as you want the dough to be strong enough to maintain its structure and texture.
How much water do I add to udon?
Hydration is the percentage of water if flour is taken to be 100%
Compared to ramen noodles which can be as low as 25% hydration, udon noodles tend to be around 40-45% depending on the weather (more on this later). This provides for udon’s chewy texture as gluten, which gives the noodle strength, develops once flour gets in contact with water, and therefore the higher the water amount, the more gluten is developed. In contrast, the low hydration in ramen noodles gives it its characteristic bite.
But because of the higher amount of gluten development, the matrix of gluten in udon noodles is much denser and stronger compared to ramen noodles, which means that they need to be cooked for a comparatively much longer time of up to 20 minutes before it’s soft enough to eat. It doesn’t help that the gluten structure is generally believed to be hydrophobic, and upon heating contracts initially and firms up, making it hard for the boiling water to enter and cook the noodle.
What kind of water is used in udon making?
The traditional belief here is that soft water should be used to make udon noodles, because when made with hard water, the surface of the udon noodle quickly becomes soft and almost soggy like before the inside of the noodle can be fully cooked, whilst also not swelling up nicely into shape we want above.
From my personal experience, soft water is of course ideal, but almost any sort of everyday water doesn’t produce that big a noticeable difference unless you’re going for the most absolutely refined noodle. However, water of extremely high hardness (>180ppm) does tend to lead to noodles that do not have the smoothest texture. I recommend just giving a quick google search to find out what the water hardness of the area you live in is.
How much salt do I add to udon noodles?
Because udon is a much thicker noodle compared to ramen, it’s actually much more susceptible to variations in the environment and temperature, and therefore the amount of water and salt used varies much more considerably. The higher the temperature, the softer the noodles quickly become and therefore less water is added. Conversely, in colder temperatures, the noodles harden quickly and so more water is added. Below is a table that shows the traditional values of how the amount of salt and water varies with the seasons.
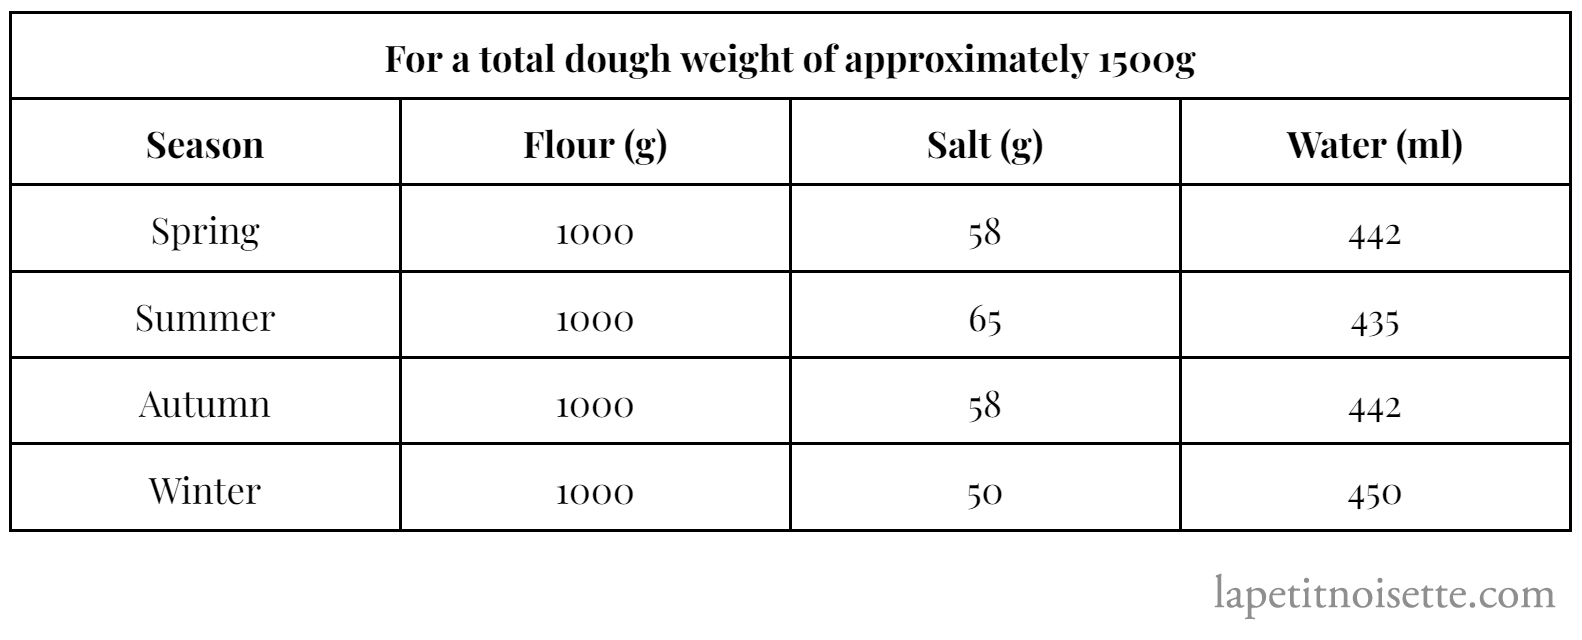
Salt in turn, causes the gluten structure to tighten up and harden slightly, which has the opposite effect of adding more water. So as the dough gets softer during the summer, you add more salt to tighten it up. This with the addition of less water, gives you noodles of the right consistency. When it’s cold during the winter and the noodles get harder, you add less salt so it doesn’t tighten as much, and you add more water to soften it.
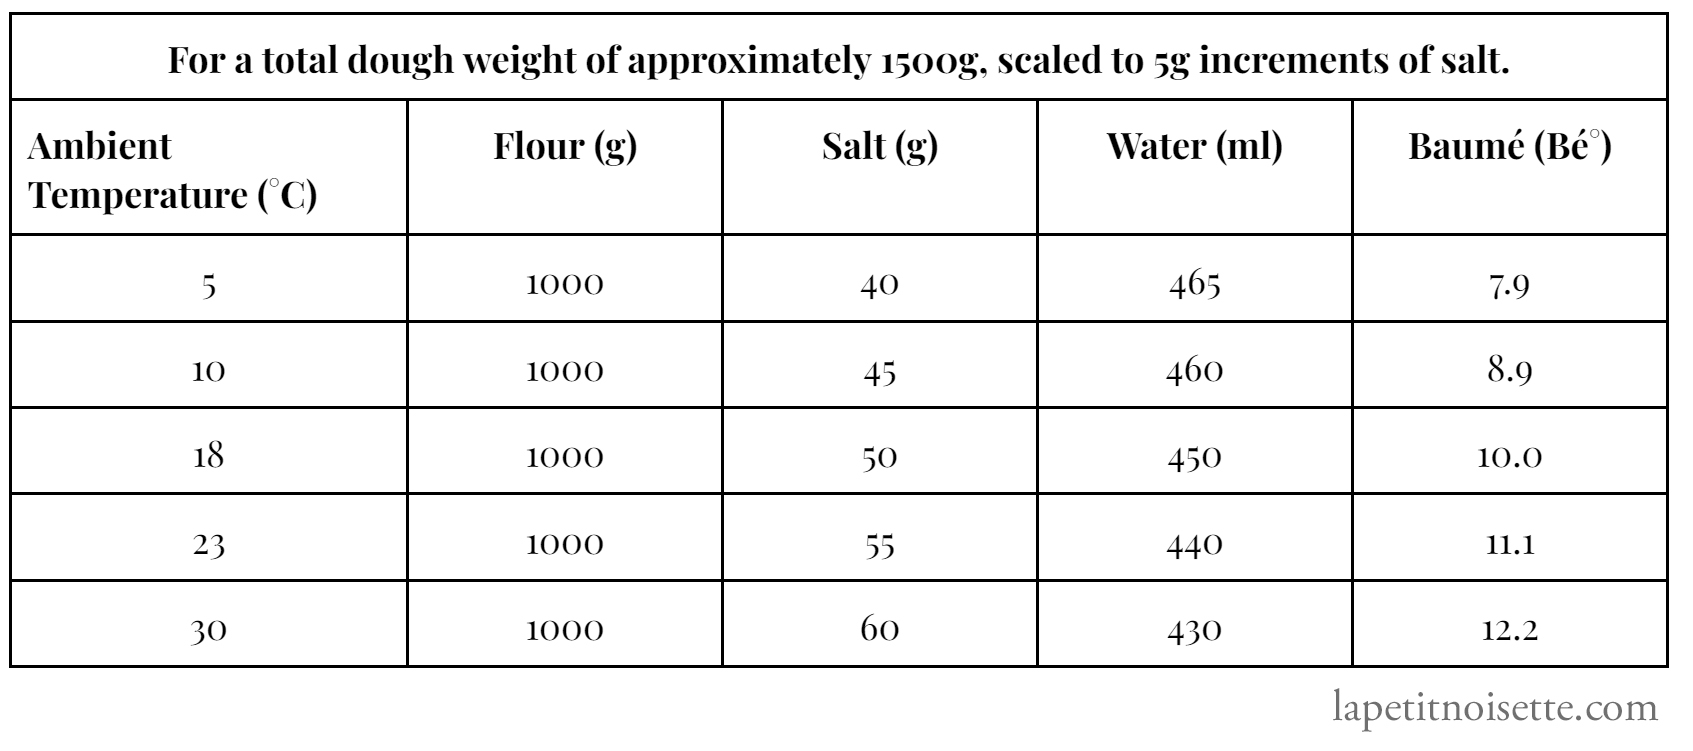
So whilst the total amount of flour is standard year round, the amount of salt and water varies. Of course a chart that just uses the seasons in Japan isn’t the most accurate due to the wide seasonal variations between countries so below is a chart based on temperature.
What is the best salt to use in handmade udon?
If you look at the chart, you’d be shocked by the amount of salt in udon noodles compared to any other noodle but if you’ve ever eaten udon noodles before, you know that they aren’t salty. The general consensus is that over 90% of the salt (some claim 99%) in udon dissolves into the cooking water during the long boiling process, which must be true given that the final noodle is not salty.
Given the extremely high amount of salt used in udon noodles, care should be given when it comes to the salt used when making such noodles. There exists a belief by some chefs that when udon is cooked and the salt leaches into the cooking water, the holes left behind by now dissolved salt in the noodles help the water penetrate and cook the noodle better. I believe that there is no scientific evidence for this.
There also is a trend of using fancy salts sourced from various places to make noodles, particularly in the ramen world, as they believe it affects the final taste of their noodles. But given that salt is mostly sodium chloride, some chefs believe that it doesn’t make a difference what salt you use, whilst others still swear that the salt they use matters. It technically shouldn’t matter where the salt originates from unless it contains a significantly high enough mineral content of other chemicals to alter the taste. Kombu salt harvested from seaweed, for example, should change the taste of your udon noodles.
One big myth to dispel though, is that salt crystal size matters. Salt that crystalizes in larger sizes like Maldon sea salt and other finishing salts tend to fetch a premium price but given that the salt is ultimately dissolved in water before added to the dough, it shouldn’t have any effect on the final taste unless, as state above, it contains a significantly different mineral content.
On a side note however, there has been some talk that the magnesium content of the salt used to make udon noodles has a large effect on the final texture of udon noodles, yielding a soft and yet elastic noodle. This is achieved by using sea salt which has a higher magnesium content than just table salt that is pure sodium chloride. I’m personally not sure if such an effect exists or not, and even if it does, is it significant enough to pursue. In the future I intend to experiment with adding nigari to udon noodles or maybe using seawater directly in the udon making process.
In the same way that ramen enthusiasts use a refractometer to ensure consistency in their soup, udon makers use a baume metre to ensure consistency when making their noodles by measuring the salt content of the water.
What flour do I use when making udon?
The topic of what flour to use when making udon is probably one of the most well researched and documented subject due to the fact that the production of flour involves big industrial players who have the funds to carry out the research and to even breed specific strains and wheat to produce flour that meets the specification of the noodle makers. Putting aside the artisanal udon makers, the majority of udon noodles made in Japan are made from flour that is actually imported from Australia. This will be covered more in depth right at the very end of this article.
The reason why is because the Australian flour imported is of the Australian Standard White (ASW) classification which has a protein content between 9.5-10.5%. In Japan, the three grades of flour you can typically find in a supermarket are low protein flour (hakurikiko/薄力粉) of around 6.5-8.5% protein that is used for cakes or tempura, medium protein flour (churikiko/中力粉/小麦粉) of around 8.5-10.5% protein that is used as an all-purpose flour and is perfect for udon, and high protein flour (kyorikiko/強力粉) for anything above 11.5% protein for ramen noodles and bread. You can sometimes find flour in a category called semi-high protein flour (jun-kyorikiko/準強力粉) which will be around 11% protein.
When making udon, the use of medium protein flour is optimal as the high hydration of the noodles means that using high-protein flour will result in a noodle with too much gluten development, whilst a low-protein flour will result in a noodle that lacks structure. This is actually good if you’re outside Japan, as you can simply buy all-purpose flour that you’d find in your supermarket. In Japan, if you can’t find medium protein flour, some recipes online substitute it with a ratio of 50:50 low and high protein flour.
You can occasionally get flour specifically designed for making udon called udonko (うどん粉) which are typically medium protein flours grown locally that have been designed to make the udon typical from that region. Be warned however, that some of these flours are on the lower end of the medium protein range in terms of percentages but are extremely high quality taste-wise and so make for a softer dough.
How do we add water to our udon noodles and why is even hydration important
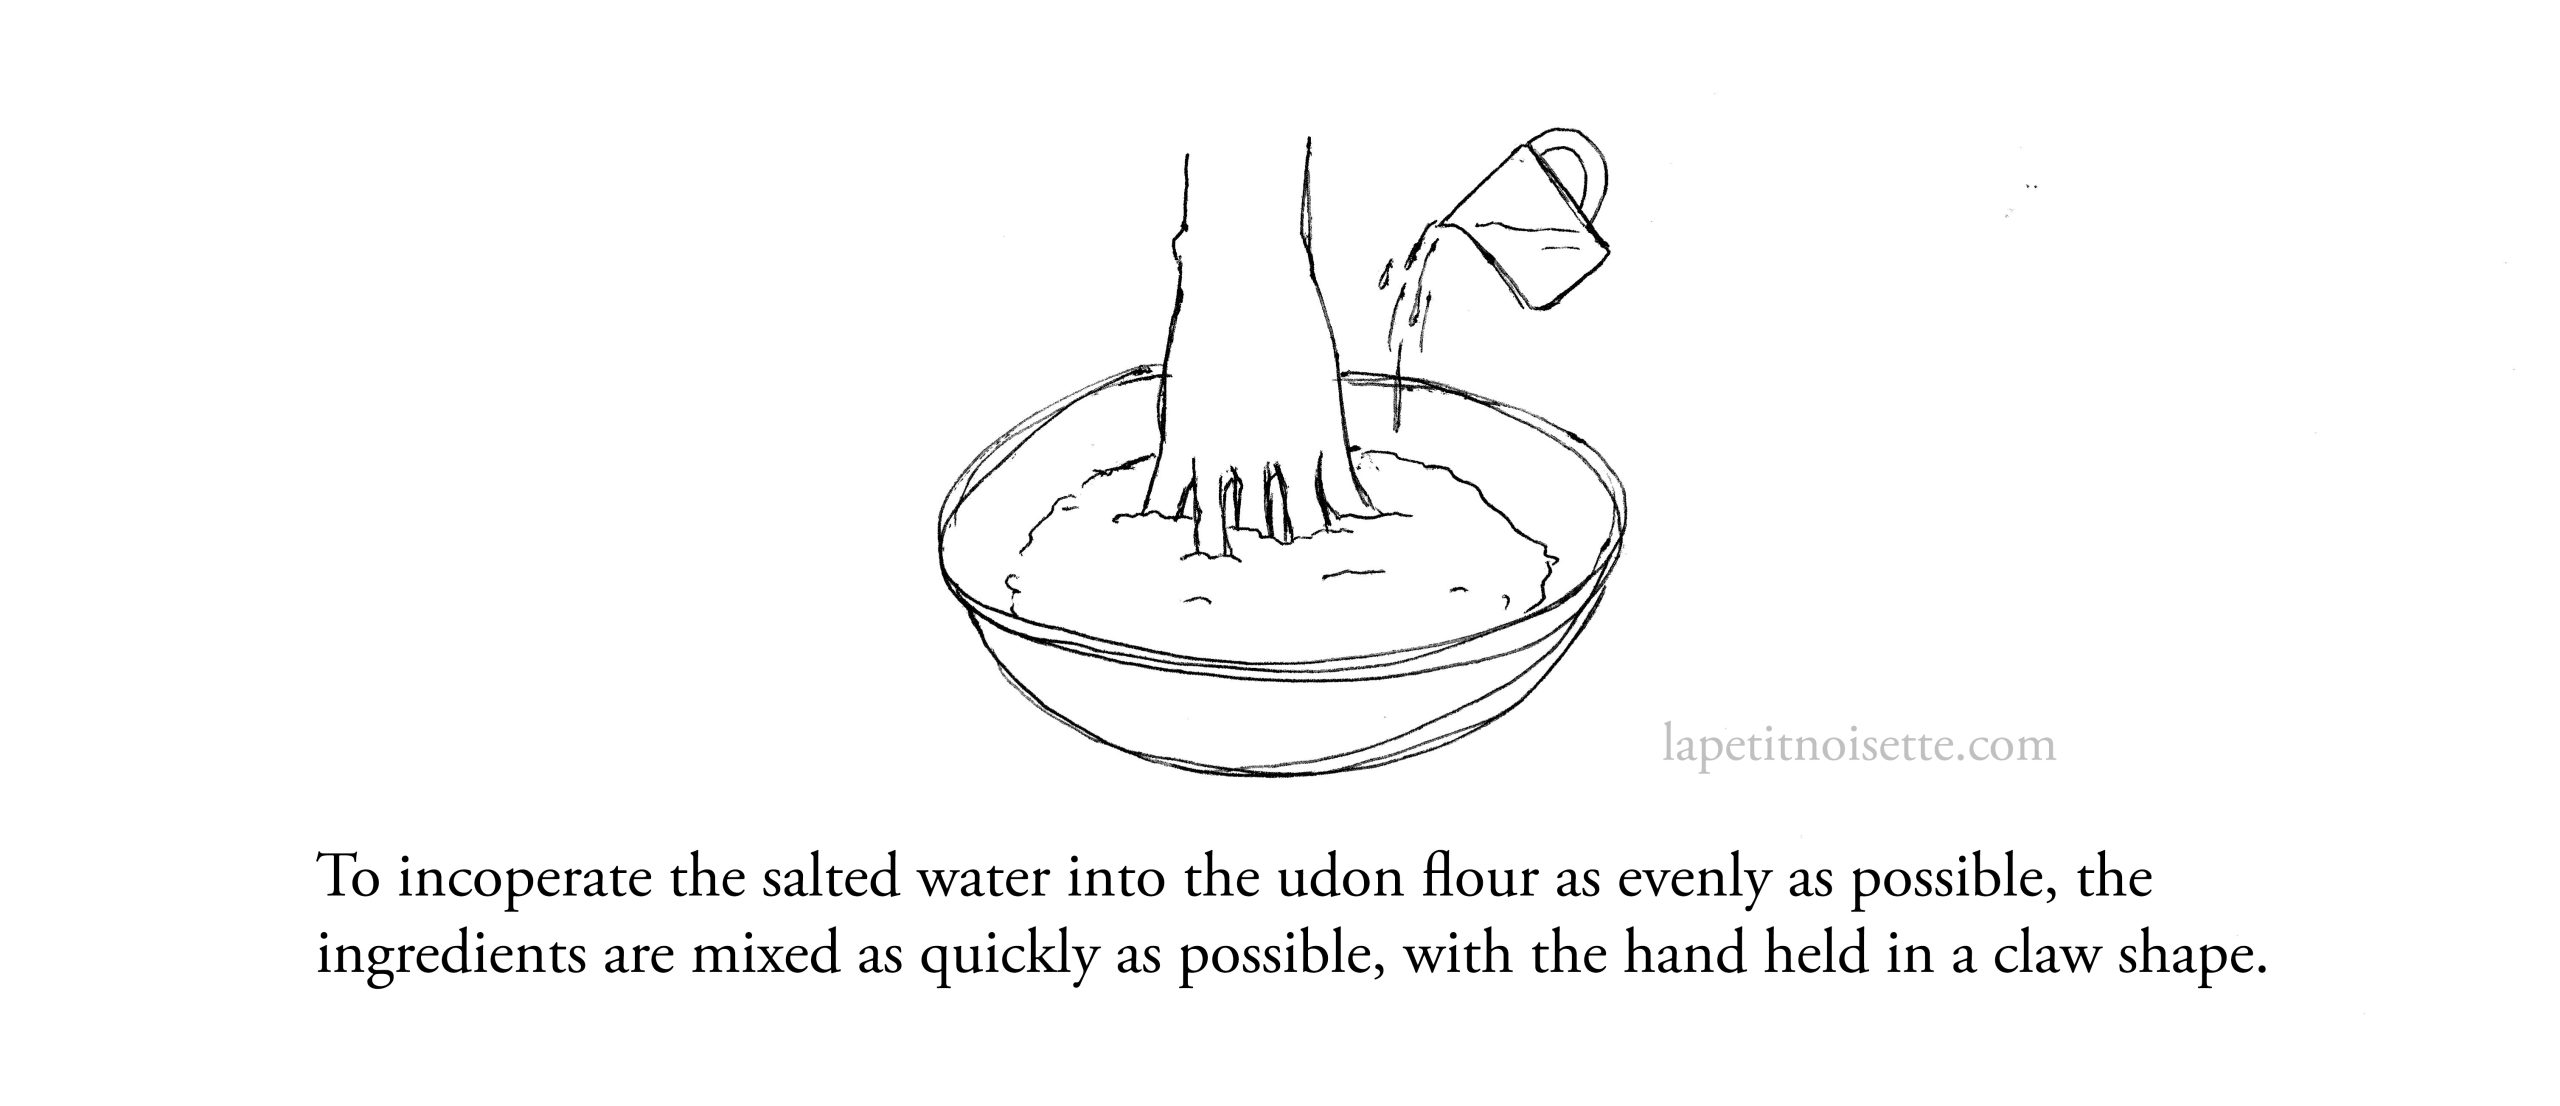
The first thing to do when making udon is to weigh out all your ingredients and dissolve the salt completely into the water before adding the salty water into the flour all in one go (unlike ramen noodles where the water is added in 2 stages). By first dissolving the salt into the water, we can ensure that the salt is evenly distributed throughout the dough. Traditionally, once the water is added to the flour, a great emphasis is put on mixing them together as quickly as possible by holding your hand in a claw shape with 5 fingers spread out and mixing it as quickly as possible. This is because gluten development begins the moment the flour comes into contact with water and mixing it quickly was a way to ensure that all the water is spread evenly throughout the flour before large clumps form. This is important to achieve a noodle dough with a uniform texture. If the water isn’t evenly spread, your dough may have pockets of dry flour with no gluten development which will cause the noodles to crack later on.
If using a stand mixer to mix the dough, it’s recommended that you try and add the water in a stream around the entire mixer instead of simply pouring it down the middle shaft so that the water is spread evenly.
Compared to ramen noodles, the dangers of uneven hydration are much lower due to the higher percentage of water but the same trick of letting the dough rest after adding water still works in both circumstances, which is covered in the next section.
Preliminary aging (予備熟成) or Soboro aging (そぼろ熟成)
Now that we’ve mixed the flour and water together, it’s important to cover the mixture or place it in an airtight container and allow it to rest for 30 minutes to an hour at room temperature or in the fridge overnight. What you’re aiming for at this stage is for the mixture to already look like one cohesive dough ball.
Whilst it seems like a trivial step, this waiting period is extremely important to making good noodles. Firstly, it allows the water in the mixture to slowly spread out evenly. Think of it as dipping tissue in water. It takes time for the water to soak up into the tissue through capillary action and the same goes here. Resting the mixture allows for a more even dough.
Secondly, the quick vigorous mixing we did when adding in the flour kick started the gluten development in the dough whilst also causing the gluten strands in the dough to contract and firm up. Trying to force this mixture in a ball and knead it will be difficult. Imagine trying to pry open a clenched fist vs relaxed one. It will be much easier to work with the dough once the gluten strands have had time to relax.
Lastly, as the mixture rests, the weight of the mixture presses itself due to gravity and squeezes out any air that may have been mixed into the dough initially, a process known as degassing. If the dough is not degassed, the pockets of air in the dough will expand when cooked, giving the udon a spongy texture. You might also find bubbles in your dough when you roll out your udon noodles, which is a symptom that the dough was not allowed to rest long enough. With sufficient resting, your noodles will become glossy and translucent, which is what we are looking for.
Why are feet used to knead udon noodles?
Probably the most famous aspect of making udon, the noodles are kneaded using one’s feet. We’ll cover the how later and the why here first.
There does exist one key point which defines how udon is made, which is how the gluten strands are arranged in udon noodles. If we look at how fresh pasta and ramen noodles are passed through their machines when being made, they are always passed through in the same direction and never rotated 90 degrees. What this does is that it aligns the gluten strands in the dough to run horizontally or lengthwise through the sheet of dough. When the sheet is too long and needs to be folded in half again before going through another pass through the machine, the sheet is folded in half lengthwise, which again ensures the gluten strands are always being ‘trained’ to run in the same direction and never criss-cross with one another. Because all the gluten strands are running lengthwise to the noodle, when you take a bite of of the ramen noodles, you’re biting them perpendicularly to the direction of the gluten strands, much like snipping a piece of string with a scissors, which therefore gives the noodles it’s characteristic bite.
In contrast, udon noodles are the complete opposite of ramen and pasta noodles. Here you deliberately rotate the dough 90 degrees before folding it over itself which causes the gluten strands to overlap one another. Alternatively, the various sides of the dough are folded towards the centre (kinda like making a paper chatterbox) before being rolled out again. This process is repeated over and over again to yield a dough that basically consists of a giant mesh of gluten strands overlapping one another, giving it not only it’s bouncy and chewy texture, but also making it a formidable opponent to knead with your bare hands. It is of course, just much easier to knead dough using your feet compared to using your hands because your feet are able to exert much more force in addition to your entire body weight pressing down on the dough, which is why feet became the standard way of kneading udon noodles. With noodle machines nowadays, a few artisanal udon shops still insist on using their feet to knead the dough, but others go for a mixture of machine pressing and feet pressing or have just completely mechanised the whole process.
What we’re trying to achieve here is to bring out the elasticity of the udon noodles and through this kind of kneading, the most skilled udon artisans were said to be able to tell the texture of the resulting noodle based on the feel of the dough and how much it gives and bounces back when pressed from the palms and fingertips.
How do we knead udon?
Now that we’ve rested the udon mixture, which should be formed into a dough ball by now, we’ll cover the more common methods of kneading it. The common principle for all udon kneading methods is that they are kneaded from centre outwards to ensure even flattening and then folded in a way to allow the gluten strands to overlap.
Place the udon dough in a large clean plastic bag that you’ll be stepping on. You don’t want the plastic bag to be completely sealed if not it’ll break when you step on it. I recommend using a transparent bag so that you can see what’s happening underneath. Alternatively, you can sandwich the dough between two plastic sheets or layers of vinyl.
One way to knead the dough is to step on the dough several times from the centre before extending it out to the left and and right to make one long straight piece of dough. The recommendation tends to be to step on it for 3 to 4 minutes but as long as you can get it fairly flat it should be good to go. Be careful that you don’t squeeze the dough out of the bag onto the floor when stepping on it.
Next, we’re going to fold the dough in the same direction as you stepped on it. So if you were stepping on it to extend it out to the right and left, you’ll want to fold either from right to left or left to right. You want to fold it several times until it resembles a scroll (refer to the picture for easier understanding). Alternatively, some people fold it using the single fold method used for croissants (you can google this).
Now comes the crucial part, rotate the dough 90 degrees and place it back in the plastic bag and step on it again from centre out again but this time from to a different direction from the previous stepping. So if you didn’t rotate the dough and you previously extended it out to the left and right, you should be extending it out to the top and bottom this time. Given that you’ve rotated the dough 90 degrees however, you won’t need to change the direction you’re facing when you step on the dough and you should be extending the dough out towards the open ends of the dough.
This is the second stepping of the dough, and you’ll want to do this for a total of 3 to 4 steppings. Each time you fold and rotate the dough, you should gradually find it getting harder and harder to step on it to make it flat, as you overlap the gluten strands over one another more and more each time you rotate and fold the dough, making it more and more elastic and strong. This might seem worrying at first but follow through, as it’s what gives the noodle its characteristic chewy texture.
After the final stepping, fold the four corners of the dough towards the centre and flip the dough over before trying to fold the dough into a ball, or dango shape as they call it. Place it back in the plastic bag for the second ageing step.
The other now less common method of kneading udon dough is to step on the dough from centre out in all directions instead of left to right giving you an uneven circular shape. Then, instead of rotating the dough and folding it, you simply pull in the sides of the dough and form it into a ball or dango shape (the same as the final step of the previous kneading technique) and step on it again from the centre out. This achieves the overlapping gluten strands as the various sides of the dough will still overlap one another. It is also repeated for 3 to 4 times before being formed into a ball again to be aged.
Can I use my hands or a pasta machine to knead udon noodles?
It’s completely possible to hand knead the udon dough if you wish with a rolling pin but bear in mind that it would require an incredible amount of physical strength or time. However, it’s impossible to use any hand cranked pasta machine to knead the dough because the mechanical stress it will put on the machine will break it over soon, whilst the space width used to pass the noodles through is too narrow to accommodate udon noodles. This means that even for electrical powered pasta machine attachments that you can buy for stand mixers do not have a gap large enough to knead udon noodles.
Why do we use a standard 1kg of flour when making udon? (1.5kg final dough)
This goes back to consistency more than anything, as it’s much easier to standardise the flour and vary the water and salt so that the final dough is around 1.5kg. It also means that the amount of time and strength needed to knead the dough is standardised. If someone of the same weight stepped on a 500g piece of dough, there will be a much higher pressure on the dough compared to a 1.5kg piece, meaning that the dough will be flattened and kneaded much faster. A 1.5kg dough gives you just the right amount to let you mix the water into the flour with your hands, knead it with your feet and roll it out to the correct noodle length. Of course machines nowadays can take much larger amounts but if you’re going with handmade noodles, I recommend using 1kg of flour.
Why should we rest our udon dough?
If you’ve worked with pasta dough before, you know that after you knead the dough, you’ll want to leave it to rest in the fridge for at least 30 minutes to allow the gluten strands to relax. The same must be done here for udon, but for a much longer period of time.
Immediately after kneading, the gluten strands are all tight and so it’s impossible to roll out the dough to the correct length without it contracting back. For pasta dough, a quick 30 minutes rest is sufficient enough for the gluten to relax enough for the dough to be rolled out, but bear in mind that the gluten strands in ramen and pasta dough are only running down the noodle in one direction lengthwise. In udon dough however, the gluten network consists of strands that are criss-crossing and overlapping one another, making for a much tighter and stronger dough which will require a much longer rest time. If you attempt to roll out the dough before it has rested sufficiently, you will either find it too hard to roll out as it will be too tough and elastic, or worse still, you might tear the dough as you rip the gluten strands apart.
When it comes to resting udon noodles, there are two schools of thought, those that believe in kneading early in the morning to give the noodles time to rest just in time for lunch (朝練り), and those that believe in kneading their noodles in the evening and resting the noodles overnight (宵練り). This is interesting because there are actually two forces at play here, one is the relaxation of the gluten network as you allow the dough to rest, and the other is development of flavour in the dough as you allow it to mature/age for a longer period of time. The short resting period is more traditional whilst overnight ageing is a more modern technique, with the proponents of it claiming that it creates a better noodle.
The relaxation of the gluten network in the dough only requires a couple of hours maximum, traditionally 3 to 4 hours in the winter and 2 to 3 hours in the summer. Any more than that doesn’t really have a noticeable effect on the dough’s elasticity. Instead, what happens after that is invisible to the naked eye, as the enzymes in the flour start breaking down proteins in dough which not only strengthens the dough in the long run, but develops flavour. All the other processes that occur in the preliminary ageing also happen, which gives the udon an even more glossy and translucent character. If you have a temperature controlled environment, the ideal temperature of ageing udon noodles is for 1 night at 18°C and 2 nights at 16°C.
Whilst the consensus of ageing ramen noodles for at least a night to a several days has definitely been proven to be beneficial, in the udon world, the verdict whether or not it actually has a noticeably difference is still ambiguous, though I must say personally the best udon I had ever eaten aged their noodles overnight, though that is just a sample size of one.
When resting or ageing your udon noodles, remember to do so in an airtight plastic bag or container as if water in the dough evaporates too much the dough will dry out and crack, especially if placed in the refrigerator. If stored in an airtight bag and you find condensation build up in the container over time, that is actually good as it is the excess water that did not hydrate the starch evaporating, leading to a more consistent noodle. However, too much evaporation until the dough becomes dry and hard is bad.
How to roll out udon dough
Now that we’ve mixed, rested and kneaded our dough, we can finally roll out the dough the noodle length. The main focus when rolling out the dough here is to make sure the dough is rolled out to an even thickness, which means rolling them out for all directions, instead of just from a single direction. We’re aiming for 2.5mm to 3mm in thickness for the ideal noodles, which we’ll explain later. If any of the steps below are unclear, email me and I’ll try to answer any questions.
Right now your dough should be a ball-like/dango-like shape and the step here is the same as the steps taken when rolling out soba dough, which is to convert this round shape to a square-ish piece of flat dough that we can then cut into noodles.
Throughout this entire process, you’d want to refrain from dusting it with any additional flours or starches until the cutting stage unless the dough starts to stick together or to the rolling surface, which means you’d have no choice but to dust the dough. This might indicate that the flour to water ratio you’re using isn’t correct or one of the steps above might weren’t carried out properly.
Take the dough ball and press it down with a rolling pin from centre out in all directions until you have a circular piece of dough that is 2cm thick. This step can be done by placing the dough back in your clear plastic bag and stepping in whilst rotating in a circle.
After this you’re going to extend the dough by rolling from the middle outwards in one direction, before rotating the dough 180 degrees and rolling it from the middle outwards again in the opposite direction. (Refer to the diagram for clearer instructions).
Now, rotate the dough 90 degrees and repeat the step above, rolling from the middle of the dough outwards in one direction, before rotating the dough 180 degrees and rolling it from the middle outwards again in the opposite direction.
This will start to shape the dough into a more square-ish shape. You’re going to want to repeat the two steps above over and over again (around 4 times) and once you have a fairly large piece of dough you can continue to repeat the two steps above but with a modification, which is instead of rolling the dough from centre out, you’re going to want to roll up your dough around the rolling pin and whilst the dough is rolled up around the rolling pin, rolling the pin back and forth. This helps flatten the dough even more.
Once the dough is almost at our desired thickness of 2.5mm to 3mm, you can continue to steps above but this time instead of just rotating it by 90 degrees and covering 4 directions, you can rotate it by 45 degrees and cover 8 directions. This will not ruin the square shape you have worked hard to create as the dough at this point should be quite flat. Continue until you reached the desired thickness.
There’s nothing to say you can’t just simply roll out your dough into any shape you want, so long as you roll in all directions, but you’d get inconsistent noodle lengths when you finally cut it. It’s very hard to get it into a complete square/rectangle on your first try and even now I’m still working on this technique.
How do I cut udon noodles?
When you imagine how to cut udon dough, you don’t want to keep the size and shape of the noodles you typically eat in mind when cutting them as they expand considerably when cooked and so you’d end up with much thicker noodles. Instead, you want to aim for noodles that are 4mm in width (explained below).
To prepare the dough for cutting, you want to fold the dough over itself a few times until the dough is the length of your cutting knife so that you can cut the dough in one pressing motion. Between each fold, dust the surface of the dough with cornstarch to prevent the folds from sticking together due to the pressure on the dough when the noodles are cut. You can be quite generous with the cornstarch at this point as you’ll boil the noodles in a large amount of water, unlike bread baking where you want to be conservative with the dusting.
It’s much easier to cut the noodles evenly if you have a noodle guiding board (komaita/こま板) to help you (the same ones used for soba noodles). As this is unlikely, your best bet is to gently steady the dough with your other hand whilst you cut the dough into noodles with your knife. Be careful about pressing the dough too much with your other hand when steadying the dough, as you may cause the layers of dough to stick together.
How thick should I cut my noodles?
When the noodles are rolled out and cut, each noodle should have 2 kinds of surfaces. Looking at the noodles from the cross section, it should have the two rolled surfaces of the noodles which is the top and bottom where the rolling pin rolled over the noodles, and the two cut surfaces, which are the left and right of the noodle where it is cut.
The cut surfaces of the noodles absorb water much easier when cooked compared to the smooth rolled surfaces of the noodles, which also mean they swell during cooking. What results is that the cut sides of the noodles tend to swell, whilst the rolled sides of the noodles tend to dent inwards as the cut sides swell outwards. The traditional line of thought here is that this makes for a noodle that doesn’t cling well to the soup as soup does not cling to outward bending surfaces. As mentioned right at the introduction, the ideal noodle shape is a balance of these two and resembles a squircle, or inverted squircle (see diagram below).
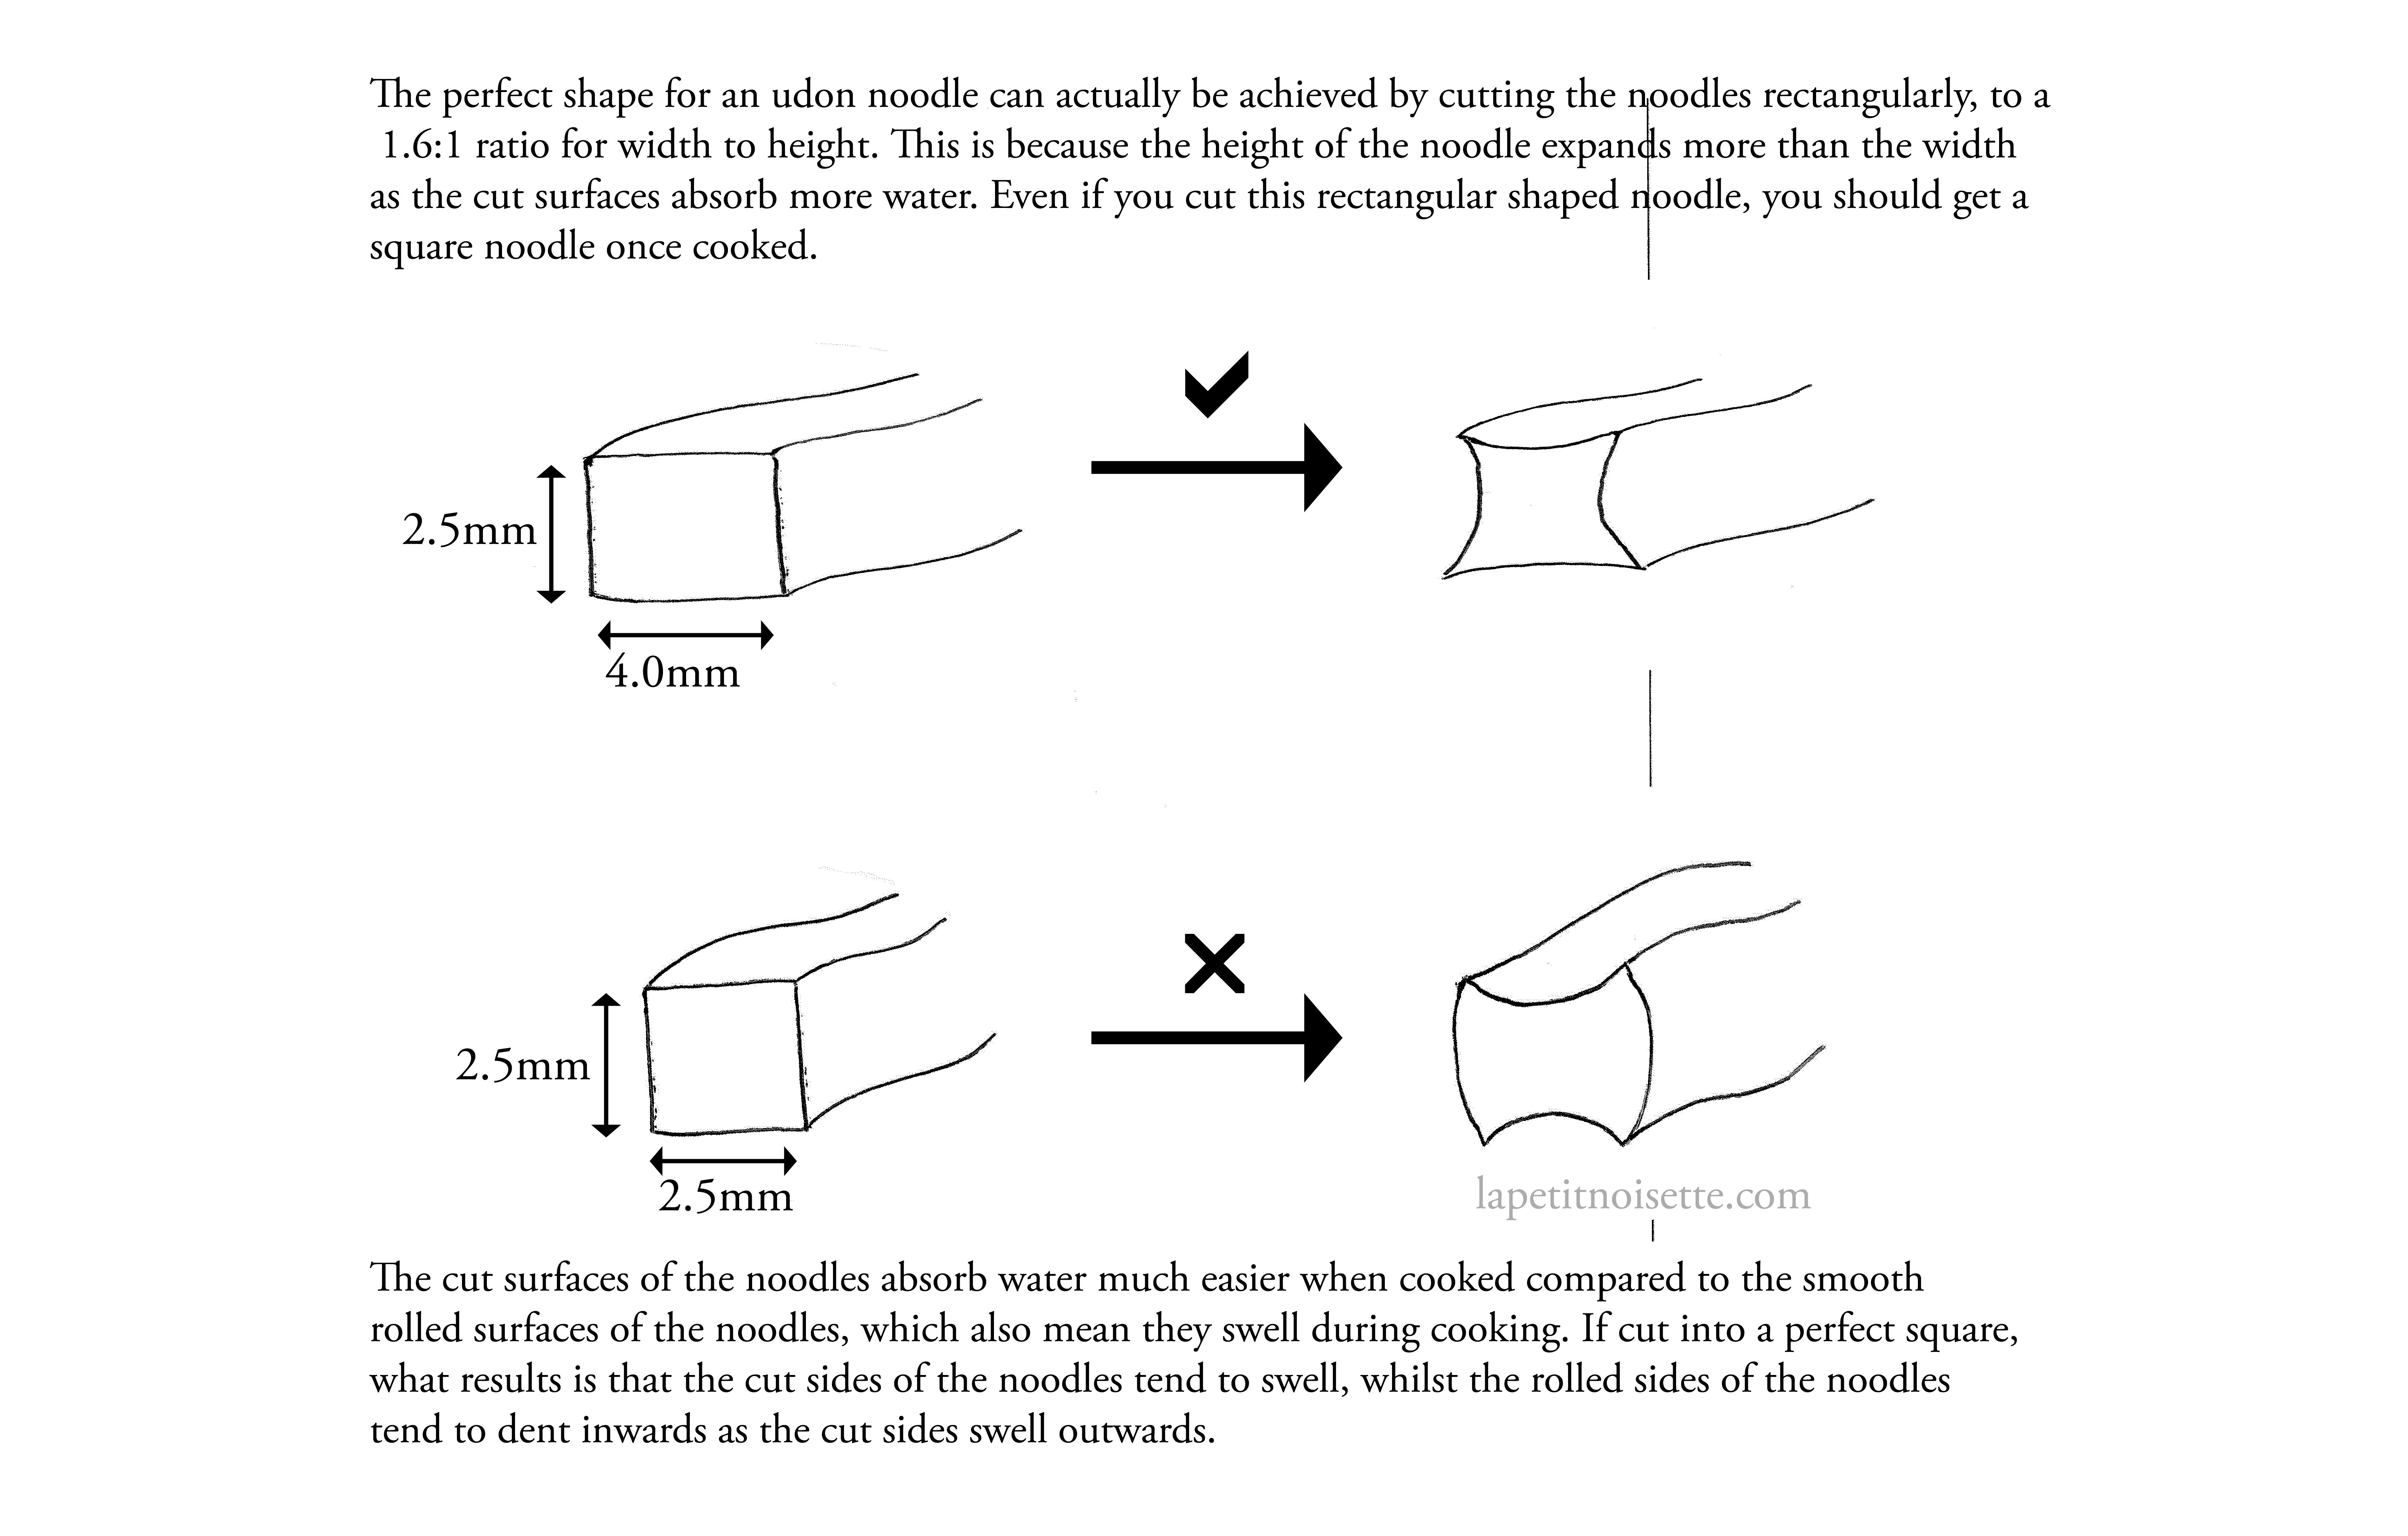
This square-ish shape can actually be achieved by cutting the noodles rectangularly, to a length of 4.0mm wide and 2.5mm in height (which is how thin you should roll out your dough. This actually translates to a 1.6:1 ratio for width to height.) This is because the height of the noodle expands more than the width as the cut surfaces absorb more water. Even if you cut this rectangular shaped noodle, you should get a square noodle once cooked.
How does the way udon noodles are cut affect cooking time
This leads us to an even more interesting conclusion, which is that the cooking time of udon noodles is not dictated by the cross-sectional area of the noodle, but the width alone. Because water is absorbed from the cut surfaces of the noodles, the distance from the cut surface to the centre of the noodle matters much more than the cross-section. When you drop the noodles into the water, the centre of the noodle actually comes up to the temperature of the water very quickly as heat transfer is a rapid process, however, what causes udon to have such a long cooking time is the fact that time is needed for the water to slowly penetrate into the centre of the noodle.
Why do we dust the noodles with cornstarch?
As mentioned in the primer on gluten above, gluten development begins when flour comes into contact with water and does not stop even if kneading stops. We typically dust noodles with flour to prevent them from sticking to each other. However, as we allow the udon noodles to rest, especially if ageing overnight, excess water from the noodles evaporates out, which will hydrate the flour used to dust the noodles. If wheat flour is used, the very outer coating that was meant to prevent the noodles from sticking, will become sticky itself and cause the noodles to meld together. Rice flour or cornstarch in turn, does not contain any gluten at all and thus is the safer choice to use. Some udon makers swear by potato starch as well, which is much more commonly available in Japan.
How long should I cook my noodles?
The high amount of gluten development in udon noodles, combined by their thick size causes them to have cooking times of up to 20 minutes, which is extremely long compared to any freshly made noodles. As mentioned above, when you drop the noodles into the water, the centre of the noodle actually comes up to the temperature of the water very quickly as heat transfer is a rapid process, however, what causes udon to have such a long cooking time is the fact that time is needed for the water to slowly penetrate into the centre of the noodle.
From my own experience and the information online, I’d recommend a cooking time of 17 minutes, with the noodles being edible at 15 minutes but at an optimal texture at 17 minutes. Some recipes call only for 13 to 15 minutes but for a noodle with a width of 1.6mm and height of 2.5mm, 13 minutes is too short from my trials. The best judge of course, is to periodically remove a noodle after the 10 minute mark to taste yourself.
This is very different from the frozen udon noodles that you can sometimes buy, that don’t even need to be cooked, but just reheated in hot water.
How much water should I cook my noodles in?
You’ll see most shops simply boil a large pot of water to cook the udon noodles and I can assure you that nobody measures out the water to noodle ratio by weight. Even so, a theoretical idea (or minimum in this case) does exist as recommended by sanuki udon schools, which is a ratio of 1:10. So for every 100g of raw udon noodles we cook, we should use 1kg of water. Sounds like a lot doesn’t it! That’s because udon noodles tend to release a lot of starch when cooked, especially if dusted with a thick layer of potato or cornstarch before cooking. This means that if less water is used, the boiling water will very quickly thicken which may cause the noodles to stick to the bottom of the pot and burn.
More importantly however, the large amount of water is meant to dissolve and remove the high amount of salt used to make udon noodles so that the final cooked product is not overtly salty.
Why should I shock my noodles in cold water after cooking?
Udon noodles are typically not only soaked and shocked in cold water after cooking, but actually given a vigorous shake and massage in ice water before being served. This also includes udon noodles meant to be served hot, where the noodles are still treated with the same cold shock process before being returned to their hot soup. The effect this has on the noodles is that it firms up the noodles and makes it closer to what people consider a ‘typical’ udon texture.
Shocking noodles in cold water after cooking isn’t unique to udon noodles however and can be found done to ramen and somen noodles, some chinese noodles, and even some pasta makers. The main idea behind washing or soaking the noodles is typically to remove any excess starch from them but even then it’s often left to individual preference regarding whether they shock their noodles or not. Most ramen restaurants nowadays do not do so.
Comparatively, shocking udon in cold water is a vital step in the noodle making process and should not be left out, as there is a much more noticeable difference when this step is omitted due to the noodle’s much thicker nature.
Udon Knife vs Soba Knife
There’s a lot of celebration around the artisanal creation of Soba noodles in the western world, with comparatively no information about udon making around. This, of course, has brought attention to the uniquely shaped soba knives that exist, a large piece of metal that is held in the same way a clothes iron is held, with a price tag that matches the most highly crafted sushi knives. Interestingly enough, an equivalent udon knife does not exist even if the way the two noodles are cut are similar in the way that they are both rolled out, dusted and folded in the same way, just with different thicknesses. Udon however, is typically cut on a board with a movable knife attached to a rail that allows the blade to be moved from left to right as you cut the udon. Most udon makers would agree that a specialised udon knifes doesn’t exist but there does exist a general knife for cutting noodles in Japan called a menkiri bocho (麺切り包丁) that just like the blade used to cut udon, is double bevelled. The knives typically used to cut soba are single bevelled.
Three cups in the summer, six cups in the winter and five cups in the spring and autumn (土三寒六常五杯/Dosankanrokujogohai)
The above saying is probably the most well known saying in the udon world, and is used to describe the amount of salt traditionally used when making sanuki udon and how it varies according to the seasons. It indicates that in the summer, one cup of salt is dissolved in three cups of flour during the summer, six cups of flour during the winter, and five cups of flour during the spring and autumn. Applying this to modern day common sense, this is obviously an absurd amount of salt to add to water and the current accepted explanation for this was that the purity of salt back then was significantly lower than today and so a cup of salt back then probably wasn’t as salty as it is today as it contained a much lower concentration of sodium chloride.
The more modern version of this is measured by the Baumé scale for the amount of salt dissolved into the water that is to be mixed into the udon. It is 24Bé° during the summer, 15Bé° during the winter, and 17Bé° during the autumn and spring.
What we haven’t covered but are aware of
Anyone who’s done serious study about ramen making knows that the world of ramen is vast and cannot be summarised in a single article. The same goes for udon noodles. The information above goes into a lot of depth regarding the traditional method used for making Sanuki Udon but nothing about other varieties of udon such as Inaniwa Udon or Kishimen Udon which consider themselves just as prominent as Sanuki Udon. We also don’t go into depth about the effect of humidity on flour moisture content which in turn affects the amount of water needed when making udon though, as it’s more relevant when making large, restaurant size portions of dough (extremely particular bakers will be familiar with this). There exists a whole world out there surrounding breeding different wheat varieties and fluctuating flour prices due to yearly weather variations, which we discovered as a large quantity of such information is made available on udon websites for restaurants, which again is not relevant to us. We also do not mill our own flour which some enthusiasts do, as it requires a whole different set of equipment and the resulting flour needs to be treated in a particular way before it is ready to be used. Milling your own buckwheat flour when making soba noodles is not unheard of, but is relatively unheard of in the udon world.
On a final note, there is also a huge world out there regarding the importation of wheat from Australia into Japan to sustain the udon making industry surrounding the regulation and laws around who controls the process and the effort that large udon chain restaurants have put into ensuring that the quality of flour the obtain consistently meets the standards they require. It is an extremely interesting read for anyone interested and I highly recommend you google Australian Standard Wheat (ASW) which is used in udon making.

Hello!
Congratulations! Your article about udon making is totally awesome and it covers information that I was not able to find anywhere.
I’ve been to Japan many times to study ramen in specialized schools and even went to Kagawa, the epicenter of udon making at the Yamato headquarters.
Please keep up the good work!
Thanks a lot.
Eduardo
Sent from my iPhone
Thank you! It’s nice to know that people appreciate the content and also help verify the authenticity of it. it takes a lot of work and effort to make this information available.
Thanks so much for sharing your research and experience in this detailed, yet succinct explainer. It answered all of my questions in one place and I enjoyed learning about the intricacies of making my favorite noodle. Moreover, I’m impressed with how accessible this article is – because it is both easy to comprehend and freely available online – for everyone, including people like me who don’t like to cook but enjoy eating. Kudos!
Thanks a lot for this detailed recipe! I love Udon and have made it myself a few times based on other (simpler) recipes I found elsewhere, but it was never as good as the best Udon I had in Japan — Looking forward to trying these techniques.
One question about the reheating of the noodles: I found that adding cold noodles to hot broth produces a soup that is overall too lukewarm for my ‘western’ friends, so I’ve been reheating them in boiling water first, but I’m always unsure about how this should affect cooking times: If I, say, reheat them for 2 minutes in boiling water, should I undercook them by 2 minutes before the shocking?
Hi, you’re mentioning the thickness of the noddles as 2.5mm. You also mention the width but you mention both 1.6mm and 4mm. Which one is correct? I am asuming 4mm and the 1.6 is actually the ratio as you mention.
Thank you for pointing out the mistake. You are absolutely correct. The width is 4mm not 1.6mm. The 1.6 refers to the ratio. The mistake should now be fixed.
Wow! This is amazing and so helpful