- How to store homemade miso after fermenting?
- What if my cooking equipment can’t store all soybeans needed for the recipe?
- Should we cook the soybeans in a pressure cooker or boil them?
- Why do we use the leftover soybean cooking liquid as the mixing liquid instead of water?
- Should we cook the soybeans in the soaking water or fresh water?
- How much water should we cook and soak the soybeans in?
- What are the factors that affect the colour of our miso?
- What proportion of soybeans should we grind?
- Why do we need to let the soybeans cool down to room temperature?
- What is seed miso (tane miso/種味噌) and do we need to add it?
- Why does miso need to be packed compactly?
- Why does miso need to be weighed down?
- What happens when mould grows on your miso?
- Why do I smell an alcoholic smell from my miso?
- Why do I smell nail polish remover or bananas from my miso?
- How do I change the texture of miso after it finishes fermenting?
How to store homemade miso after fermenting?

To harvest your miso, remove all the coverings on the miso and gently scrape away any mould on the top layer. Mix up the entire contents of your miso container to even out the taste of your miso. This is because the top layer tends to be slightly darker as it’s exposed to more oxygen and is also saltier as more evaporation occurs on the surface. It also helps to even out the distribution of the liquid tamari.
As homemade miso is still alive and constantly fermenting, once it’s reached your desired fermentation point, we recommend storing the miso in airtight containers in the fridge for short term consumption or in the freezer for long term storage.
In the fridge, the miso will still continue to change but at a much slower pace. Alternatively, it’s possible to keep the miso in its container or barrel for up to 3 years and see how it slowly changes with time, just remember to press the miso down after taking some and reseal the lid. If you think the miso is starting to dry out or become too dark and earthy for your liking, then it’s time to empty out your fermentation container.
After fermenting, your miso is safe to consume and can already be stored away. However, if you’re worried about this, it’s possible to pasteurise the miso if you have a sous vide machine. Simply, vacuum pack some miso and heat it at 71.7°C/161°F until the miso is heated thoroughly.
What if my cooking equipment can’t fit all the soybeans needed for the recipe?
While not often discussed, it’s actually possible to make your miso in batches and fill your fermentation container in parts over several days. If you intend to do so, just make sure you don’t salt the top of the first batch of miso after packing it in the container. Instead, simply cover the container with cling wrap before pushing the cling wrap into the container so that it sits directly on the miso. Remember to push the cling wrap against the walls of the container as well to seal the miso. When you make your next batch of miso to fill the container, simply remove the cling wrap and pack in the additional miso into the container. Once you’ve filled your container to your desired level, salt the top of the miso and continue with the recipe instructions. In a few weeks, you may mix the entire contents of the barrel to make sure the miso from different batches will ferment evenly.
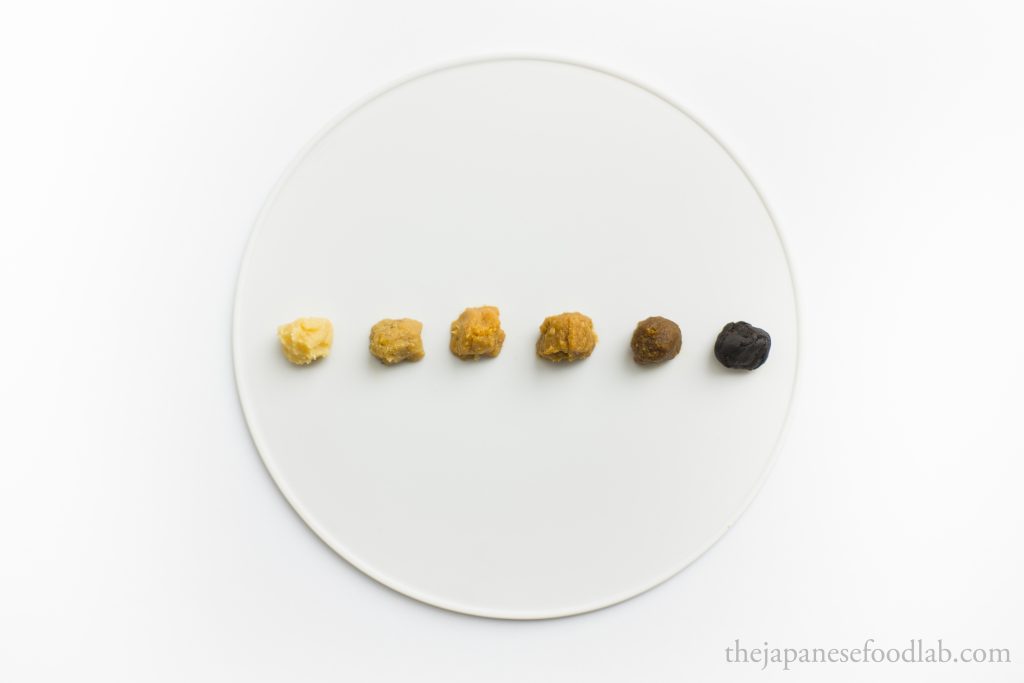
Should we cook the soybeans in a pressure cooker or boil them?
The decision around cooking your soybeans in a pressure cooker or through boiling is usually one you make depending on the equipment available in your kitchen unless you’re aiming for a specific style of miso. The longer it takes to cook your soybeans, the darker they become. From a light yellow to a deep yellow and finally a reddish brown. This is why the soybeans for sweet white miso are always cooked in a pressure cooker as you want to get the cooking done as fast as possible to preserve the whiteness of the colour. In fact, the lightness of the colour of sweet miso is sometimes how makers are judged on their skill and the quality of miso they produce, so much so that the techniques to maintain their sweet miso’s light colour are secret. In contrast, if you want to make a red miso, you can simply boil them for a few hours to achieve the deeper red colouration. To make arguably the darkest miso, hatcho miso, the soybeans are steamed for a whole 6 hours. This also affects the taste, as the longer cooking time brings out earther and more savoury flavours from the soybeans. If you’re simply making miso to experiment or do not care about a specific style, then choose whichever method is most convenient to you.
Why do we use the leftover soybean cooking liquid as the mixing liquid instead of water?
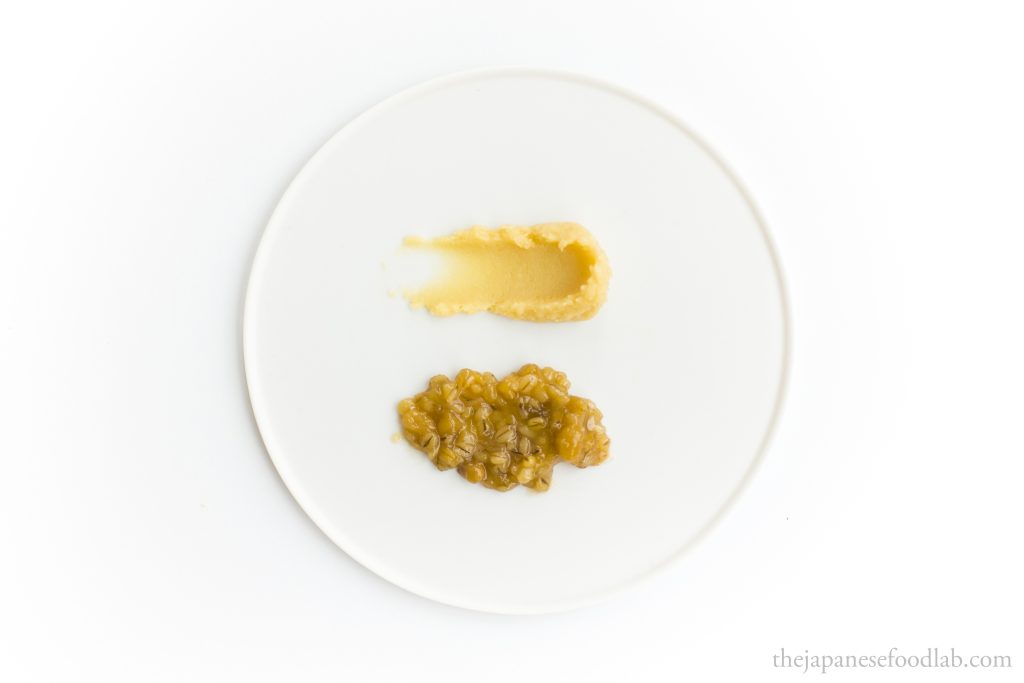
Some people argue that using the soaking liquid to cook the soybeans then using the leftover cooking liquid to make the miso helps to preserve the nutrients of the miso. This point aside, decisions regarding the use of different liquids to make miso also revolve around the type, taste and colour of the miso you wish to produce. For example, sweet white miso and yellow miso is produced by always replacing the soaking water and cooking water as you want to remove as much colour from the cooking of the soybeans as possible. By constantly changing the water, you’re also giving the miso a lighter and fresher taste as the soaking cooking liquid does not have time to deepen in flavour and colour (see question above). To create red miso, you want to reuse the water as much as possible, thus using the same water to soak and cook the soybeans, before mixing it into the miso. This allows the soybean liquid to darken, yielding the reddish brown colour we associate with red miso.
Should we cook the soybeans in the soaking water in or freshwater?
See question above.
How much water should we soak and cook the soybeans in?
Due to different environments, the freshness of the soybeans and the method used to dry them, it’s impossible to predict how much water your soybeans will absorb when you soak and cook them. Ideally, you’d cook your soybeans in just enough water so that the amount of cooking liquid left after cooking the soybeans is the exact amount you need to mix into your miso. The resulting cooking liquid has as concentrated a soybean taste as possible, which then contributes to the taste of your miso. Doing this is incredibly hard to predict and adding too little water will result in your soybeans burning. If you’re willing to put in the effort and you’re boiling your soybeans, some people periodically add water to their pot of boiling soybeans to ensure there’s always enough cooking liquid left over. If they end up with less than the required cooking liquid, they then add boiled water to make up the required mixing liquid.
If you’re not too bothered with this bit of finer detail, the safest and most straightforward way to cook your soybeans is with plenty of water as it’s always better to end up with too much mixing liquid than to risk burning your soybeans. There’s no remedy for the burnt taste that will be added to your miso if you accidentally char the soybeans at the bottom of the pot and thus the whole batch of soybeans will have to be discarded.
What are the factors that affect the colour of our miso?
As mentioned above, both the way the soybeans are cooked and the way water is used when preparing the miso are both factors that affect the colour of your resulting miso. Other factors include the koji to soybean ratio, with misos made with higher proportions of koji usually being lighter in colour (also due to their shorter fermentation time). Some people also rub their soaked soybeans together to remove the hulls from the beans before skimming them away to achieve a lighter colour.
What proportion of soybeans should we grind?
The proportion of soybeans you grind also has an effect on the rate of fermentation. This is because grinding all your soybeans will greatly increase the surface area exposed to the koji’s enzymes, especially if you choose to go all the way to a smooth paste, or choose to grind some of the koji with the soybeans. We have found that grinding the miso into a paste before fermentation can lead to less predictable results than desired so our preference is to grind 60 percent of the soybeans to encourage fermentation but still maintain some consistency. Instead, we prefer to grind or blend the miso into a smooth paste after fermentation is done if we desire such a texture. Most artisanal made non-sweet miso still retain some of the chunky-ness in their miso with the downside being the need to strain out the solids if making miso soup.
In the end, feel free to experiment with different grinds to obtain the style you desire. For example, we greatly enjoy our barley miso with whole barley koji left inside but with completely ground up soybeans.
Why do we need to let the soybeans cool down to room temperature?
If you mix hot or warm soybeans with your koji there is a risk that the enzymes made by your koji, which are themselves proteins, will start to stop working as they denature and become permanently damaged. This happens at temperatures above 60°C/140°F. To be safe however, we tend to let the soybeans cool down to room temperature as it gives us the most stable starting point for our miso. It is possible to start mixing the miso together when the soybeans are at 37.7°C/100°F but this is usually not done unless for miso that calls for very quick fermentation times (a few days to weeks).
What is seed miso (tane miso/種味噌) and do we need to add it?
The best analogy for seed miso is that of sourdough starter. By adding a small amount of finished miso to a new batch of miso, you’re essentially inoculating the new miso with the same community of bacteria and yeasts that lived in the previous miso. We have found this useful as it helps stabilise newly made misos when they’re most prone to mould growth. They also gently direct the flavour of the new miso you’re making to the one of the seed miso.
Seed miso is not a necessary addition when making miso but is something that can be experimented with, especially if you have access to high quality miso you can buy or are already using at home. Just make sure that the seed miso does not contain preservatives or is pasteurised, else the microbe community in the miso will already have been wiped out and there will be no transfer into your new miso.
We’ve actually heard a story of a miso producer who’s workshop was burnt down, including his precious wooden fermentation room barrels that were important as they housed the microbe community that not only gave his miso its unique taste but was cultivated through the history of his family’s miso production. Luckily enough, they were able to salvage a large enough quality of old miso to reestablish the same microbial community in the barrels of his rebuilt workshop and ultimately continue producing miso with the same taste. We’ve personally experimented with seed miso particularly with a high koji ratio blend of barley koji and were blown away with the results.
We’ve also heard that seed miso can reduce the fermentation time of batches of miso but haven’t noticed the difference in small batches. This may be something that occurs in larger batches or requires more investigation.
Why does miso need to be packed compactly?
Air pockets in your miso are the ideal location for bacteria or mould to take hold and grow. To prevent the risk of this happening, it’s best practice to pack down your miso as tightly as possible into your container to be safe. In the event that mould grows on top of the miso, the mould will also not be able to penetrate into the inside of the miso.
Why does miso need to be weighed down?
As your miso ferments, it’s natural for air pockets to appear as beneficial bacteria produce gas. If the air pockets become too large, there’s a danger of mould growth or the beneficial bacteria community growing too large, causing the taste of the miso to change. By adding fermentation weights, you’re ensuring that the miso is always under pressure and the air pockets will get squeezed out of the miso. Air pockets in your miso are natural and will appear as your fermentation proceeds. So long as you are weighing down your miso, don’t worry if air pockets appear.
What happens when mould grows on your miso?

If you find white mould growing on the top of your miso, it’s most likely simply koji regrowing on the miso and there’s no worries about it. If the mould is any colour other than white, then there’s slightly more cause for concern. Your miso is most likely safe as the mould is only growing on the surface of the miso, so when you harvest your miso, simply remove the top layer and taste the rest. If even the inside of your miso is mouldy, unfortunately the whole batch must be discarded. This is a sign that not enough weight was added on top of the miso, the tools you used to make the miso weren’t clean enough or that not enough salt was added. If you need to taste your miso, make sure you don’t mix the mould into the rest of the miso.
If you’re using a traditional wooden fermentation barrel however, I’d recommend removing any other mould from the top of the miso, as it has a chance of growing into the wood and permanently damaging or discolouring it. This is especially if you have a wooden inner lid that comes in directly with the miso. On that note, we always recommend using an inner lid for the miso and a generous application of salt.
Why do I smell an alcoholic smell from my miso?
If your miso starts to smell alcoholic, this is most likely due to the yeasts living in the miso not having adequate oxygen to carry out aerobic respiration and thus producing alcohol as a byproduct of aerobic respiration. As soon as possible, you should remove the lids and seals from the miso and give the contents a good mix to oxygenate it before repacking it. Your options going forward are to maybe change to a container with a wider mouth, or make sure the lid on the miso is so tight fitting that a little oxygen can’t go in.
We’ve also found that miso produced in tiny batches tend to develop alcoholic smells. This is why we recommend a minimum of 3 litres of miso made per batch.
Why do I smell nail polish remover or bananas from my miso?
If your miso starts to smell like nail polish remover or bananas, the process of esterification has started to occur in your miso. This is when acid produced by the bacteria reacts with alcohol produced by the yeast to make esters. Esters are what gives fruits their amazing smell but in miso making are an unwanted byproduct caused by the lack of oxygen in the miso. The most common ester forming in your miso is ethyl acetate which is produced with water when acetic acid reacts with ethanol as given in the equation below.
CH3COOH + CH3CH2OH ⇌ CH3COOCH3CH2 + H2O
Unlike the production of alcohol, mixing your miso to oxygenate it only helps slightly and sadly the smell of esters is here to stay. While the strength of the smell subsides slightly when you cook with the miso, it never completely goes away. Your best bet is to tweak your setup the next time you make miso.
How do I change the texture of miso after it finishes fermenting?
After your miso has fermented, you can then decide the final texture by either blending a proportion of it in a blender, potato mill or food processor. If you want a completely smooth paste then go ahead and blend all your miso. If you’ve made barley miso, bear in mind that it’s very hard to get a completely smooth paste due to the germ of the barley.
If you’re after as smooth as paste as possible for sweet miso, consider passing the miso through a tamis sieve several times as they would to make smooth red bean paste.

After 6 weeks I replaced my chickpea miso into a wide mouth mason jar and sealed it with a vacuum sealer.
It’s been another six weeks since and the miso still tastes salty and not miso-y enough. Do you think I have created a ‘too anaerobic’ environment for the miso to ferment?
If you vacuum sealed it and it’s not leaking it definitely would be anaerobic. I don’t know if there might be other fermentation processes that could occur, but the miso yeast needs oxygen to ferment normally. It may turn alcoholic smelling that way.